




Design a PDF Invoice Template
Design how the PDF invoices you issue to patients look: start from a ready layout or a blank A4 page, place your fields and choose the template when you issue an invoice.
Updated
In Medicasimple you can design how the PDF invoices you issue to patients look. With Invoice PDF Templates you start from a ready layout or a blank A4 page and place your logo, practice, patient and invoice fields wherever you want them on the page. You choose the saved template when you issue a PDF invoice, so every invoice keeps the same look.
This guide shows you how to create a template, arrange the page sections and fields, style the items table and choose the template when you issue an invoice.
Not the same as e-invoicing: This guide is about how the PDF invoice you issue from Medicasimple looks. A PDF invoice template does not set up an electronic invoicing integration and does not turn a PDF invoice into an official e-invoice. Screens and options can vary with your user permissions.
How it works
Template: a reusable PDF invoice layout you set up in Settings. You can save more than one.
Sections: the page is made of sections such as the page header, bill to, items, summary and page footer.
Fields: practice, patient, dentist and invoice details. They show sample values in the template and are filled with the invoice’s own details when you issue it.
Issuing: you choose the template when you issue a PDF invoice. If you don’t choose one, the built-in default template is used.
1. Create a template
Open Settings → Invoice PDF Templates. You’ll find it under Treatment Settings in Settings.
Click New template.
Choose a starting point. Default layout comes ready with the page header, bill to, items and summary. Blank A4 starts from an empty page and you add every section yourself.
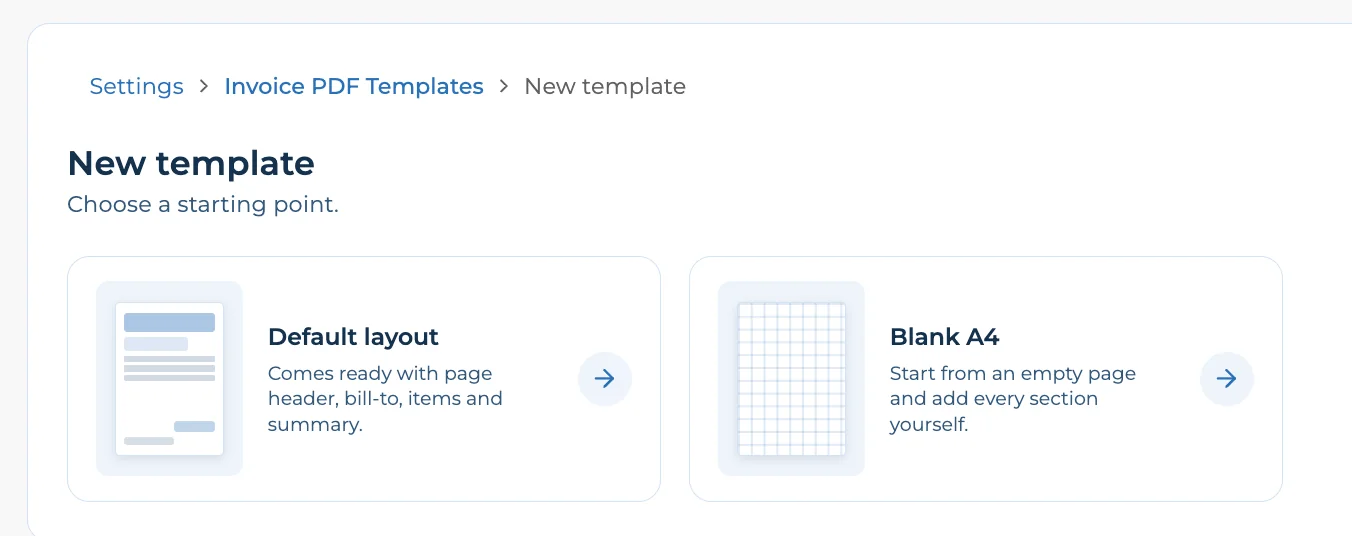
Tip: For your first template, Default layout is the quickest start. If you print invoices on letterhead, start with Blank A4 and place the fields to fit the free space on your paper.
2. Name the template and set the invoice layout
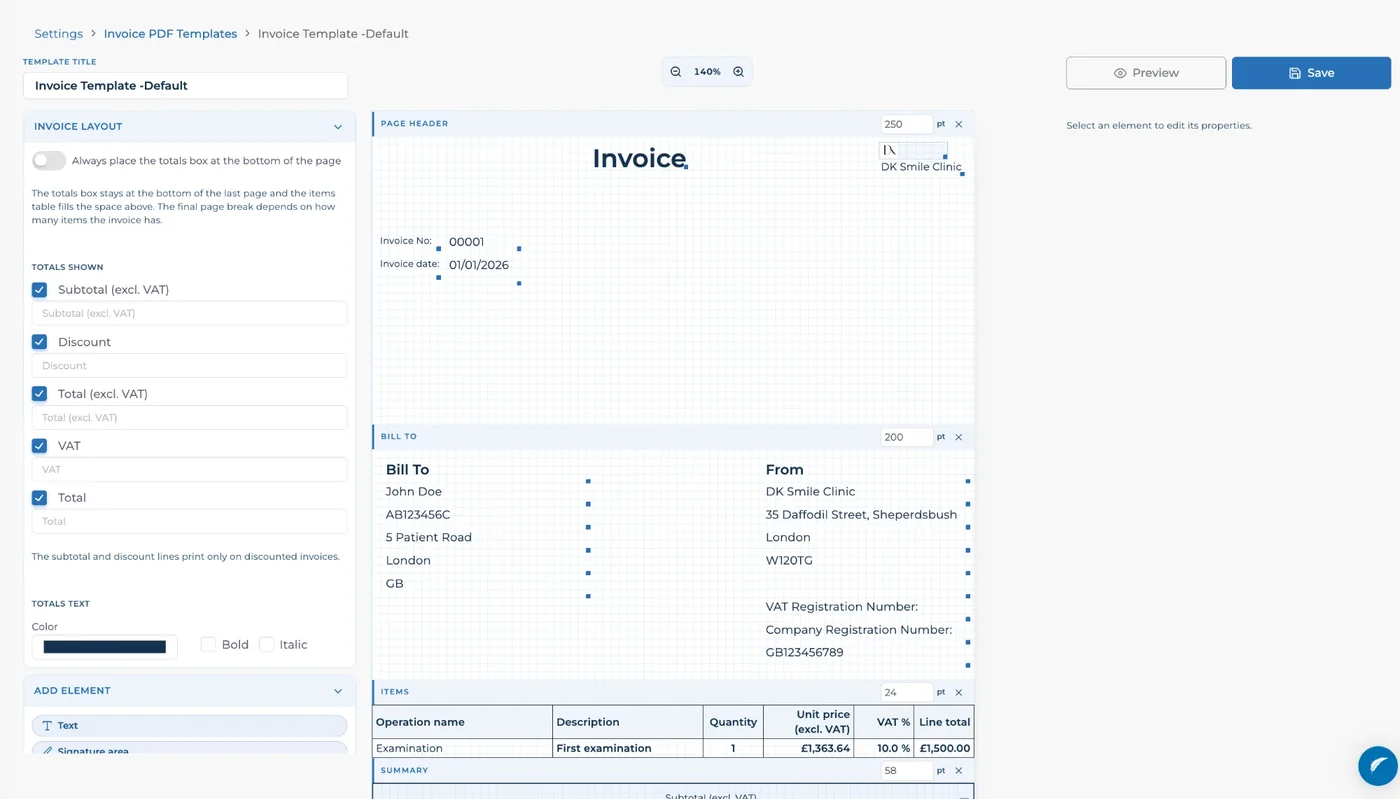
The editor shows the settings and the fields you can add on the left, the A4 page in the middle and the properties of the selected element on the right. Use the zoom buttons above the page to zoom in and out.
In Template title at the top left, enter a name your team will recognise, for example Standard Invoice. A new template starts as Untitled template.
In Invoice layout, decide where the totals box goes. If you turn on Always place the totals box at the bottom of the page, the totals box stays at the bottom of the last page and the items table fills the space above it. Where the last page breaks depends on how many items the invoice has.
In Totals shown, tick the lines you want on the invoice: Subtotal (excl. VAT), Discount, Total (excl. VAT), VAT and Total. In the box under each line you can enter the text you want on the invoice, for example Amount due instead of Total. The subtotal and discount lines are printed only on invoices with a discount.
Under Totals text, choose the colour of the totals. You can also make them bold or italic.
Totals are calculated automatically from the invoice items. The template only sets how they look.
3. Arrange the page sections
Each section on the page has a header with its name, its height and a remove icon.
Page header: details at the top, such as your logo, practice name and the invoice title.
Bill to: the patient and practice details for the invoice.
Items: the table that lists the treatments on the invoice.
Summary: the invoice totals.
Page footer: fields at the bottom of the page, such as your address and contact details.
To change a section’s height, enter a new value in points in the box on the right of the section header.
To remove a section, click the × on its header.
To add a section that is not on the page, use Add section in the left panel.
4. Add fields, text and your logo
Select the section on the page where you want to add a field.
In the left panel, open a field group, such as Practice, Patient or Invoice, and click the field you want. It is added to the selected section.
Drag the field to where you want it on the page. Use the handles on its edges to resize it.
Under Add element, use Text for your own wording, Signature area for a space to sign and Practice logo for your logo.
Which fields can I add?
Practice: practice name, official title, practice address, city, county, country, postcode, phone, email and VAT number.
Patient: patient name, ID number, address, neighbourhood, county, city, postcode, country, phone and email.
Doctor: the dentist’s name and registration number.
Invoice: invoice number, invoice date, payment method, currency, total, subtotal, discount amount, total excluding VAT, VAT amount, VAT rate, grand total, total in words and notes.
Each field in the list shows a sample value. When you issue an invoice, the fields are filled with that invoice’s details.
5. Style each element
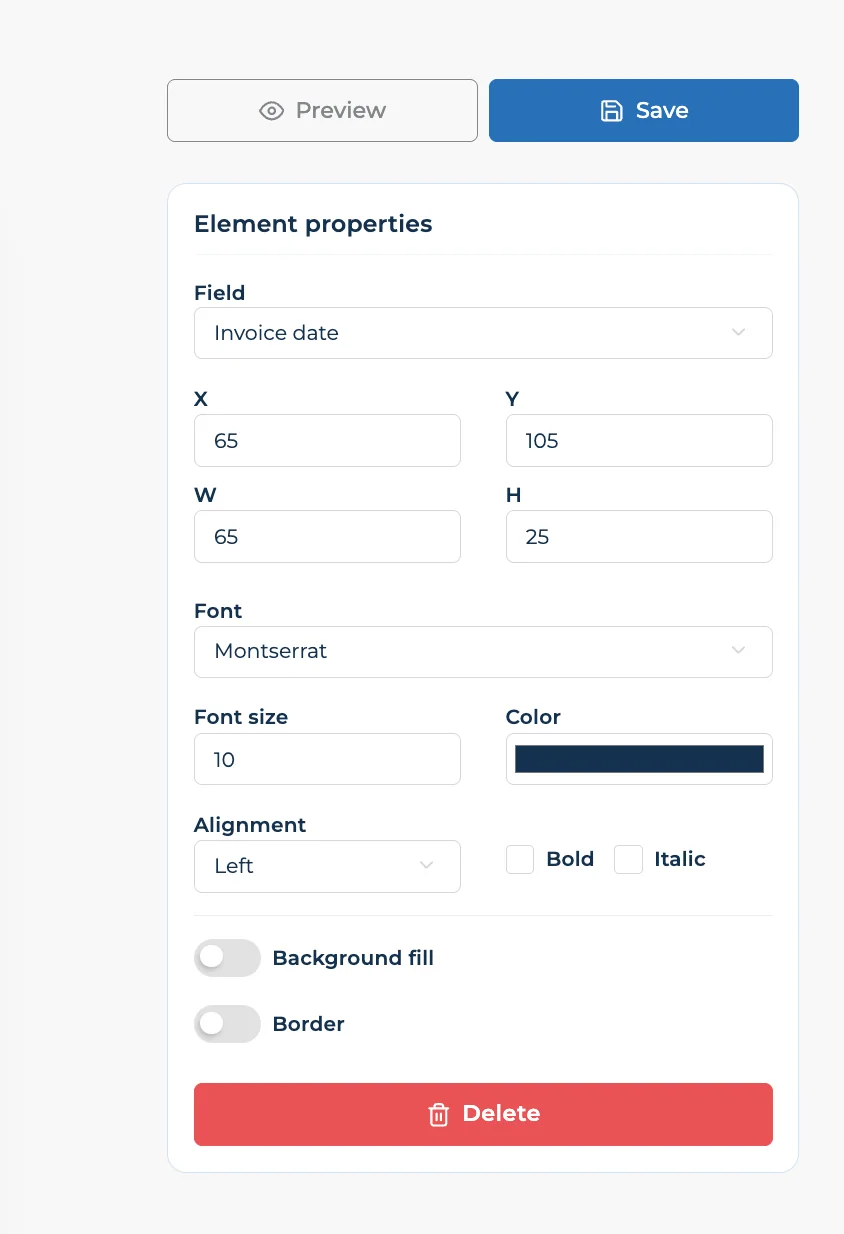
When you click an element on the page, the Element properties panel opens on the right.
Field: changes the detail the element shows.
X, Y, W and H: set the element’s position, width and height as numbers. This is useful for placing fields precisely on letterhead.
Font, Font size, colour, Alignment, Bold and Italic: set how the text looks.
Background fill and Border: turn these on to give the element a background colour or a border.
Delete: removes the element from the page.
6. Style the items table
When you click inside the items table, for example on an item row, its settings open in the right panel. Click the table itself, not the blue section header.
Table borders: turn borders on or off with Show borders and choose the Border colour. Row separators and Column separators turn the lines between rows and between columns on or off separately.
Header text and Row text: set the font, size and colour of the table header and the rows separately. You can make either of them bold or italic. Turn on Background fill to give the header row a background colour.
Table columns: choose what each column shows, its heading, width and alignment. Use the arrows to change the column order, the bin icon to remove a column and + to add one. Each column also has its own header, row and row background colours and a bold option.
Columns can show details such as the treatment name, description, tooth, quantity, VAT %, unit price excluding VAT and line total.
Printing onto pre-printed invoice paper
If your invoice paper already has the item rows and column headings printed on it, turn on Pre-printed paper (overlay). It is the first option in the table settings, just above Table borders.
With this option on, no items table is drawn. You place the Item fields freely on the page so they line up with the columns on your paper.
Row pitch (pt) sets how far below the previous item each item is printed. Set it to the row height on your paper.
The editor shows how many rows fit on a page at that row pitch.
To check the fit, print a test page on plain paper and hold it against your pre-printed paper.
7. Preview and save
Click Preview at the top right to see how the template looks as a PDF. The preview shows the template with a sample patient and sample items.
When you are happy with it, click Save.
Your saved template is listed on the Invoice PDF Templates page.
8. Choose the template when you issue a PDF invoice
Open the patient’s profile and go to the Payments tab.
Click Create Invoice.
Select PDF Invoice as the invoice provider.
In Invoice template, choose the template you want. If you leave it empty, the built-in default template is used.
Enter the invoice number, select the payment type and the treatments to invoice, then click Create Invoice.
To see the patient’s invoices, click Create Invoice again and open the second tab. Use the download icon to save an invoice to your computer.
Troubleshooting
I cannot see Invoice PDF Templates
The page is under Treatment Settings in Settings. If you cannot see it, ask an authorised user to check your access. If the problem continues, contact our support team.
I cannot find my template when I issue an invoice
Make sure you clicked Save in the editor and selected PDF Invoice as the invoice provider.
The totals box stays in the middle of the page
In Invoice layout, turn on Always place the totals box at the bottom of the page.
The discount line is not on the invoice
The subtotal and discount lines are printed only on invoices with a discount.
A field is empty on the invoice
Fields are filled from the details entered when you issue the invoice and from the patient or practice record. Check that the detail is saved, for example the patient’s address.
If the template cannot be saved or the PDF invoice does not look as expected, contact our support team.
Good to know
A template only sets how the PDF invoice looks. The items, amounts and totals come from the invoice you issue.
You can save several templates and choose the right one for each invoice.
PDF invoices issued without a template use the built-in default template.
Frequently asked questions
Can the template match our existing letterhead?
Yes. Start with Blank A4, place the fields to fit the free space on your paper and fine-tune their positions with the X and Y values.
Can we print onto our pre-printed invoice paper?
Yes. Click the items table and turn on Pre-printed paper (overlay) at the top of the right panel. Then place the Item fields to match the columns on your paper and set Row pitch (pt) to its row height. See step 6.
Can I add a place to sign?
Yes. Add the Signature area element from Add element and drag it where you want it.
What happens if I don’t choose a template?
The PDF invoice is created with the built-in default template.
Keep going