




Patient Flow: Kanban View in the Calendar
Switch between the calendar and the Patient Flow board in one click, drag patients between stages and set up the board for your practice.
Updated
Patient Flow is a Kanban board that sorts the day’s appointments into columns by where each patient is right now. You can see who has arrived, who is waiting, who is being treated and which appointments are complete on one screen. When you drag a card to another column, the appointment status is updated too.
This guide shows you how to open the board, move patients between stages, keep track of patients who did not attend or cancelled, and set up the board for your practice in Board Settings.
Tip: For the day, week, month and planner views, see the Calendar View guide. Patient Flow does not replace these views: you switch between them in one click.
How it works
Stages: the board has Appointments, In Waiting Room, Under Treatment and Completed columns. Each column header shows how many appointments are in that stage.
Cards: each card is one appointment. It shows the start and end time, the patient’s name, the appointment type and the practitioner.
Statuses: each stage is linked to one or more appointment statuses. When you drag a card into a stage, the appointment takes that stage’s status.
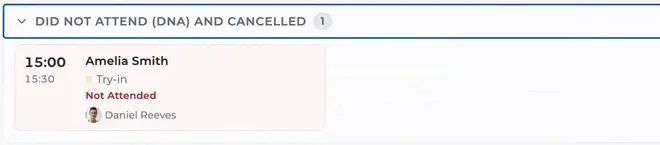
Did Not Attend (DNA) and Cancelled: appointments whose status is not linked to any stage are collected in this tray under the board.
Live updates: changes on the board reach everyone who has it open, without refreshing the page.
1. Open the Patient Flow view
Open the calendar.
At the top right, click the icon next to the Day, Week, Month and Planner buttons. When you hover over it, Switch to kanban view appears.

The board shows one day’s appointments. Use the arrows next to the date to move to the previous or next day, and Today to come back to today. As in the calendar, you can filter practitioners with the eye icon.
To go back to the classic calendar, click the same icon at the top right of the board again.
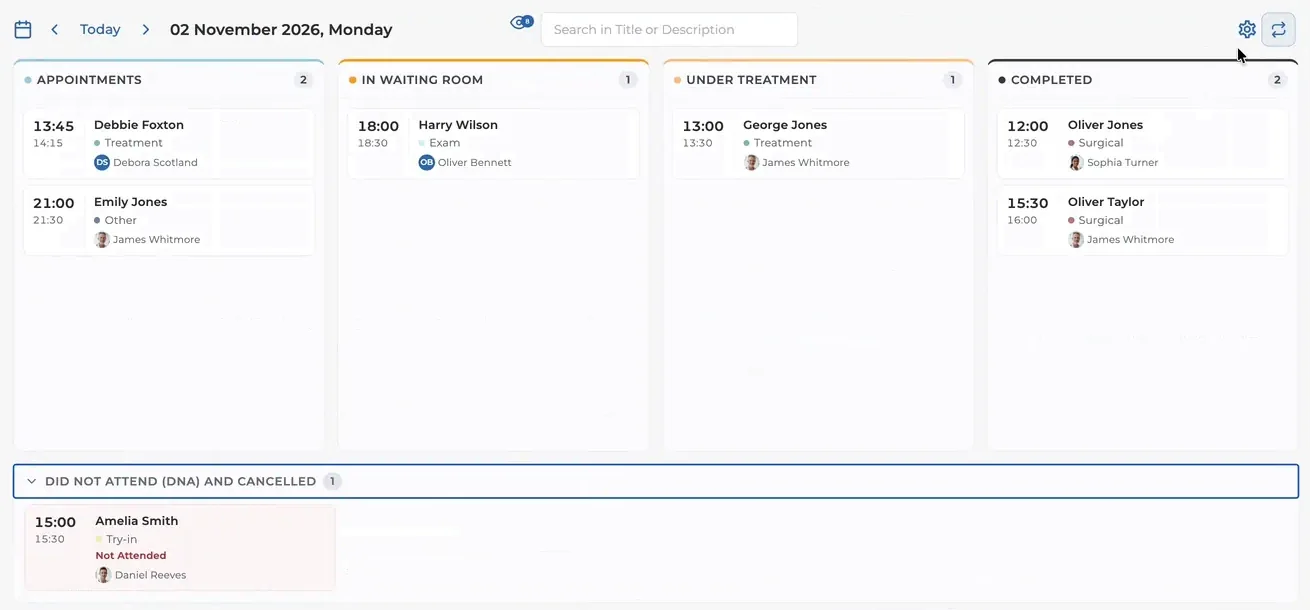
2. Move patients between stages
When a patient arrives, drag their card from Appointments to In Waiting Room.
When the patient goes in for treatment, move the card to Under Treatment.
When the appointment is over, drop the card in Completed.
The appointment status changes as soon as you drop the card. For example, In Waiting Room is linked to the Arrived status, so a card dropped there is marked Arrived. You can see and change which status each column carries in Board Settings.
Important: Moving a card between columns only changes the appointment status. The date, time and practitioner stay the same.
3. Keep track of DNAs and cancellations
Appointments whose status is not linked to any stage, such as Not Attended or Cancelled, are collected in the Did Not Attend (DNA) and Cancelled tray under the board. The tray header shows how many there are. Use the arrow on the header to open or close the tray. Each card in the tray shows the appointment status in red.
When a patient does not attend, drag their card into this tray and the appointment is marked Not Attended.
4. Set up the board in Board Settings
Click the gear icon at the top right of the board. The Board Settings panel opens on the right.
View: the board view. Patient Flow is selected for the board in this guide.
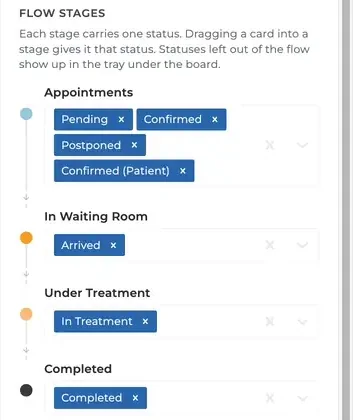
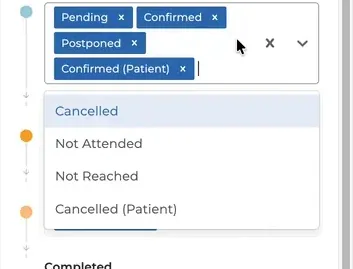
Flow Stages: sets which appointment statuses each stage carries. To add a status to a stage, click the stage’s field and choose the status from the list. To remove a status, click the × next to it.
Cards: use the Text Size slider to make card text larger or smaller, and switch Use AM/PM Time Format, Show practitioner and Show appointment type on or off.
Reset to Default: returns the board settings to their defaults.
Here is an example stage setup:
Appointments: Pending, Confirmed, Postponed, Confirmed (Patient)
In Waiting Room: Arrived
Under Treatment: In Treatment
Completed: Completed
With this setup, Cancelled, Not Attended, Not Reached and Cancelled (Patient) are not linked to any stage, so those appointments appear in the Did Not Attend (DNA) and Cancelled tray. Close the panel with the × at the top right.
The whole team works from one board
Changes on the board appear instantly, without refreshing the page. When the front desk moves a patient to In Waiting Room, practitioners and nurses with the board open see it straight away. Keep the board open on the front desk and surgery computers so that on busy days the whole team works from the same up-to-date picture.
Troubleshooting
I cannot see the Kanban icon in the calendar
The icon is at the top right of the calendar, right next to the Day, Week, Month and Planner buttons. If you cannot see it, refresh the page. If the problem continues, contact our support team.
An appointment is missing from the board
Check the following:
Is the board showing the right day? It shows one day’s appointments.
Is the appointment’s practitioner selected in the eye icon filter?
Is the appointment status linked to a stage? If not, the card is in the Did Not Attend (DNA) and Cancelled tray. Open the tray to check.
I moved a card but the appointment did not get the status I expected
In Board Settings, check under Flow Stages which status the stage you dropped the card in carries.
I cannot see a change a colleague made
The board shows changes instantly. If a change does not appear, refresh the page. If the problem continues, contact our support team.
Frequently asked questions
Does Patient Flow replace the calendar?
No. You switch between the two views at any time with the icon at the top right of the calendar. Both views show the same appointments.
I moved a card to the wrong column. What should I do?
Drag the card back to the right column. The appointment status is updated again to match the column you drop it in.
Can I change which appointments appear in a column?
Yes. In Board Settings, under Flow Stages, add or remove the appointment statuses each stage carries.
Can I change what the cards show?
Yes. Under Cards, you can show or hide the practitioner and the appointment type, and change the text size and time format.
Keep going